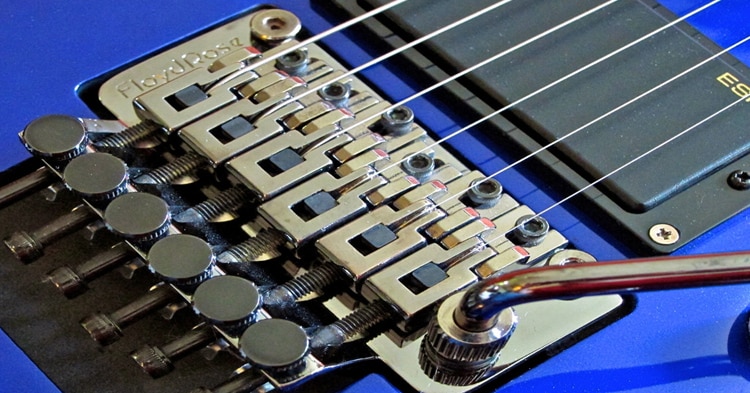
Owning a Floyd Rose can be daunting, so we’ve made this step by step guide to teach you how to restring and clean your guitar. Presented by Warwick Levey and Chad Browne of the Gryphon Music Academy.
The Process
Tools
- Strings
- Stanley Blade
- Toothbrush
- Paintbrush
- Silvo
- Lem Oil
- Guitar Polish
- Pegwinder
- Side Cutters
- Microfibre Cloth
- Masking or Painters Tape
- Allen Key 3mm
Removing old strings
- Unlock the locking nut using your 3mm allen key
- Loosen the bolts with your fingers and remove the locking pads
- Unwind the each machine head until there is no tension on the string
- Cut the strings in half
- Remove the top half from the headstock by uncoiling it.
- Loosen the saddle locks using your 3mm allen key
- Pull the string out
Cleaning
(This is the most time consuming element of the restring)
- Brush dust from the guitar with a paintbrush
- Then using a toothbrush give the bridge a scrub
- Use your paintbrush again to remove any dust that the toothbrush dislodged
- Tape up the neck of the guitar leaving only the frets exposed
- Dip a rag into the silvo, and apply silvo to the frets. No force or pressure is needed
- Using a touch of good old fashioned elbow grease, buff the silvo off the frets
- Remove the tape from your board
- To remove grime from the fret board, as well as any silvo residue, spray a fretboard cleaner on the fretboard and scrub it with your toothbrush
- Apply a small amount of lem oil onto the fretboard. Rub the oil into the wood and remove the excess
- Spray a fine mist onto the guitar
- Using a microfiber cloth, polish your guitar body in a uniform direction to prevent unsightly streaks
- Repeat this process for the headstock
Restringing
-
- Gently uncoil the string
- Cut the ballend from the string, directly behind the windings
- Inset the string into the saddle and tighten the saddle lock. Be careful to over tighten the block as you can strip the thread if you do. Also, be careful that you don’t under tighten the block as that will cause the string to pop put once you tune to pitch
- Thread the string through the eyelet making sure you go over the nut and under the retainer bar
- The method we use to ensure that we have enough slack on the string is to:
- A) Pull the string all the way through
- B) Lay your index finger on the third fret with your ring and middle finger underneath the string
- C) In a smooth motion lift your index vertically while your second and third finger maintain tension on the string
- A good method to reduce string slipping and therefore add tuning stability is to thread the string through the eyelet of the machinehead, adjust for some slack to create windings and then begin turning the peg anti clockwise to get tension, at the first full rotation tuck the string tail in under the taught section of the string and continue to wind the string up with tail passing under, then at the second full rotation pass the tail of the string over the taught section, this will cause the string to tighten down onto itself and prevent slipping
- Before tuning to you should make sure that the fine tuners are sitting at a more or less neutral point, leaving enough room for the pitch to travel when fine tuning. First unscrew the low E fine tuner till it is as far out as possible, then adjust the high E fine tuner until it is as far in as possible and use the two extremes as a level when determining the middle point of the A string fine tuner. Then adjust the other 5 to match the A
- Tune your guitar
- Snip the tails at the machine head
- Replace locking pads
Now that the strings are on, all that is left is for you to go jam.